| Previous page | Techniques & KB Articles | Next page |
| Understanding site import and export | ||
Understanding site import and exportThe Site Manager allows you to import sites in to your server, and export sites from it. File typeAn exported site produces a file of type filename.ncx ImportingPlace the filename.ncx file on your local machine. In the Server Manager, select the User who will own the Imported site, then right-click and select 'Import Site' from the context menu. Use the import tool to select the file and upload it to the server.
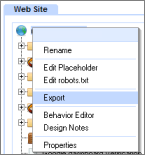
When a site is imported, it is 'unwrapped' in to the various files needed on the server. If the server build is more recent, the system then updates the format of the files and data structures to match the server. Depending on the size of the site, this process may take some time. To ensure that the process does not adversely affect the server performance for serving other sites, the process is given a lower than normal priority. Troubleshooting "Import of site failed..." You cannot import an ncx file of a site that was created on a neatComponents installation that is more recent than the one you are installing onto. This is the most usual reason for an import failure. If an import of an ncx fails unexpectedly, the first thing to check is that the neatComponents you are installing onto has the same build number - or higher - than the originating installation. The first step to resolution is to upgrade your neatComponents installation to the latest version. How to check the build number ncx file size No specific error message is shown, but it should be clear from the browser upload progress that the upload was interrupted. In some cases IIS does not accept uploads of large files, and for this reason an import may fail because the file cannot be uploaded. This can be fixed by logging into the server and, at an administrative command prompt, enter: c:\windows\system32\inetsrv\appcmd set config -section:requestFiltering -requestLimits.maxAllowedContentLength:2147483647 followed by: IISRESET ExportingSites may be exported from the Server Manager, or if permissions allow, from the web site itself . This is how sites are exported from Cloud Trials. Select the site-node (globe icon), right-click, and select Export from the context menu. When a site is exported it is 'wrapped' in to a single file: filename.ncx, and a link is provided to the .ncx file.
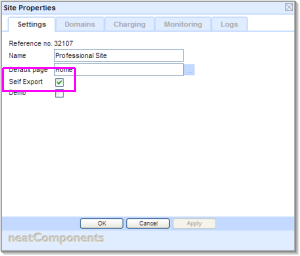
Save the file to your local machine. This file is deleted from the server after an hour (or if the process is interrupted) to prevent the server filling up with site export files. Depending on the size of the site, this process may take some time. To ensure that the process does not adversely affect the server performance for serving other sites, the process is given a lower than normal priority. System requirementsThe import and export processes make use of the Windows zip/unzip handler to perform the wrapping and unwrapping part of the process. If the default zip handler has changed to something else (for example WinZip) the process will fail, until the Windows default zip handler is restored. This can be done on the server by: My Computer / Tools / Folder Options / File Types / 'zip' / Change / Select 'Compressed (zipped) folders' The permission to allow child-sites to self-export is controlled by a permission in the Server Manager - Site Properties dialog. Select the site in the Server Manager tree, then right-click to access Properties.
If 'Self Export' is not enabled, the option to 'Export' will not be displayed in the Child Site root node. |
|


