  |
| Previous page | Data Integration | Next page |
| Queries and Views | ||
You might think that you could simply say to the system that it should display a Table on your page, but to do that would prevent you from having control over the appearance of the list, the order the contents are shown in, and indeed which fields in the table you want to show. To do this we need to introduce a couple of concepts: Queries, and Views.
Queries: Queries allow you to sort, and select the raw information provided by the data feeds. Views: Views take the output from a Query, and present it to users in a variety of ways: from a simple table of information; scrolling news tickers; calendars, etc. The Table-Query-View system also allows the construction of multiple data-entry pages, booking systems and many other web-related database manipulations, without having to do any programming. What happens is that the Table contains the information you typed in, and it is then passed through a Query, where you get to specify which fields to display, and the order they appear in (both left to right, and top to bottom), and this is then handed on to a View, where you can style it, specifying fonts and colors. You then place this on a Page, and the users can see your information. nC provides numerous different Views: eg Grid, CSV, and Custom. A range of data types allow for the intelligent handling of textual, numeric, file and image data, as well as joins between datafeeds. Custom View The Custom View is a separate component that is embedded on a surface and which gives you total control over how the output is displayed. Using Custom Views is the most commonly used method to display Query output. Read more about the Custom View here...
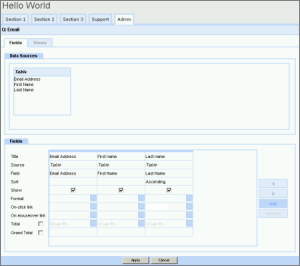
Query settings Embedding - paging When the View is embedded on the page, you can specify some further preferences. For example, if you have a lot of books it might be annoying to have really long pages, so you can choose to show the list in pages of, say 20 books. Then, when the list is shown, it shows the first 20, and then provides paging links 'Showing items 1-20 of 43000' or whatever, with links to subsequent pages. Query by Example: How to Slice and Dice results Naturally, if your list really is that long, paging links like that are still going to be unwieldy when you are trying to find a particular item. So neatComponents provides a method to quickly provide a search form, where users can type in an example of what they are looking for, and then a list of matching results is shown. This facility is called "Query by Example". You get to specify how the search form looks: which fields you will let them search by, and how the form is laid out. You can even add in comments to guide them, or simply pretty it up with graphics. Dropdown fields For example, if you want to store the Format of a book, you would want to know if it is Hardback or Paperback. Whilst you could provide a text field for this, people are likely to be inconsistent in how they enter the information: "Hardback", "Hard-back", "Hb", etc. Such variation makes it hard for users to search the list. We can solve this problem by using a Dropdown field. Recordlink fields A logical extension of the book example would be to add a category field, so we can say what general topic the book is about. As with the Format field, we have the choice of using a text field or a dropdown field. We can rule out the text field for the same reasons as it was inappropriate for the Format field. However, the dropdown field has its own problems here. The issue is that whilst the Format values of Hardback and Paperback are limited in number and unlikely to change, there will be many more categories, and they are likely to be added to and amended frequently. This makes the categories list a good candidate for being given its very own Table. This Table can be very simple: it only needs a single text field, "Name", to contain the name of the Category. However, splitting it off like this allows it to be managed by users who you don't want to mess with the format of the Book form. Once we've created the Category Table, and entered the various category names in it, we can return to the Book table, and add our Category field. We can now use the recordlink datatype, which operates in the same way as the dropdown field, except that instead of listing the categories out within the Book table, it simply refers (or 'links') to the Category table. It is worth noting that the Query, despite showing information from both the Book and the Category tables, only has to contain the fields from the Book table. The names are taken automatically from the Category table without you having to specifically include it, making Query construction quick and intuitive.
|