
  |
| Previous page | Text Tutorial: Step-by-Step | Next page |
| Embed Custom View | ||
 What are we learning here?
We learn how to use a Custom View to give us greater control over data visualisation.
We learn how to use criteria to define which information to display.
Custom Views of Queries allow you to construct complex apps and web pages quickly and easily.
The Custom View works by applying control parameters so that as you link to them the information displayed is restricted down from all the possible combinations of the data to just the information you need for that particular purpose.
In the following example we are going to link from the simple Grid view we constructed earlier to a Custom View embedded on the 'Section 3' we added previously to show just the details of the person selected.
To do this we are going to make a modification to the Query Q:Email to create a link, and then configure the Custom View.
Modify Query
Return to the Query Q:Email and use the link picker (highlighted) in the 'Last name' column to set the On-click link: to go to Section 3. Then click the [Apply] button.

This will have the effect of making the last name displayed in the Grid view a clickable link with Section 3 as its destination.
Configure the Custom View
First, add a Custom View to the Config section of the website tree, and rename it CV: Email

Next, open the Custom View CV: Email, and associate it with the Query Q: Email by using the Query picker drop-down - and click the [Apply] button.

You have the opportunity here to also set the important SEO meta-tags for the Custom View, but we can skip those for this example.
Appearance
Next, we need to set what the Custom View looks like.
So, from the floating Toolbox select: Edit Text | Records
This will open a new surface where we can construct how we want our view to appear.
You add the Field embeds by using the embed tool , and choosing from its Picker.
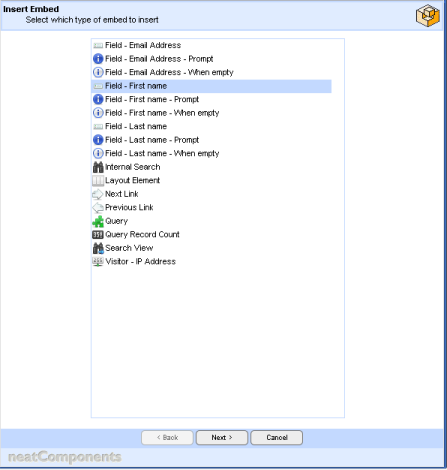
We want to use a mixture of standing text and embedded fields - you can make the standing part as fancy as you like, but make sure it looks at least as complete at this.

Then 'Save' when you are complete.
Embed the Query
Go to the destination page - Section 3 - and Embed a Query on the page, by using the embed tool, and choosing the Query radio-button.
Configure the Embed Display
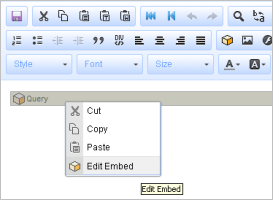
Open the Query properties, by selecting the Embed and right-clicking to 'Edit Embed'
In the Components-tab use the drop-down Query selector to set the Query to be Q: Email .
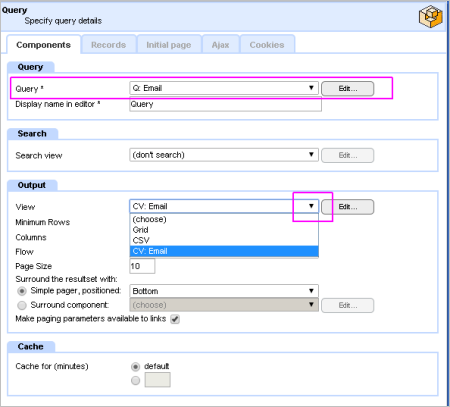
Next, select the 'Output-section' and set the 'View' to be CV:Email using the drop-down selector - as shown above.
Then select the 'Records-tab'.
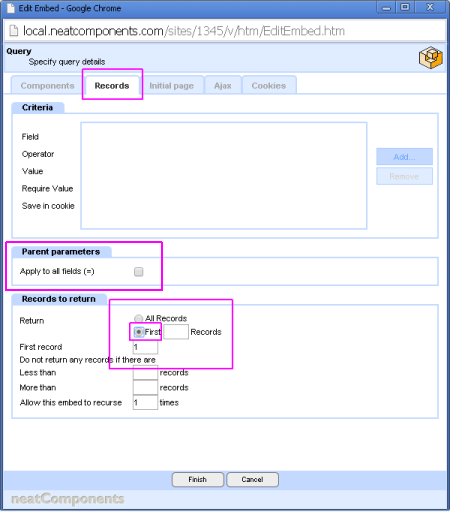
Check the Parent Parameters box - to restrict the selection.
Be sure to set the 'Records to return' as shown. Then click [Finish], to return to the page Text Editor, and then Save.
Testing
Now - test out what you have done.
Go to Section 2, select one of the listed 'Last names' and click on it.
You will be taken to Section 3, with only that record to view, displayed exactly as you formatted the Custom View.
![]() Now - on to Working with the system
Now - on to Working with the system
Below the line...
More information
The system gives you great control over how data is formatted, but is also very easy to use. You will have noticed that there was very little configuration required to restrict the display to the selected records, and the parameters necessary are inferred by the system.
Dialogs are context aware
The dialogs that control the behavior of the system are context aware. This means that you are presented with only the controls you need for the task in hand. As your task changes, so the available controls change - automatically.
As you build more advanced applications the appropriate control dialogs will become available. You are never faced with a large array of confusing controls.
It uses a lot of hidden 'cleverness' to make your task as a designer easier, the inferred parameters is one example - here is another.
Go to the Support page and add in another 'visitor', only this time 'forget' to enter the email address - and submit the record. Now go to 'Section 2' and click on your new visitor's Last name. No email address is shown - OK - but note is the 'prompt' is not there either. So, if the entry is blank its prompt is automatically suppressed; keeping your finished display crisp. And many, many, more...
| |||
| Text Tutorial: Step-by-Step | |||
|

