What are we learning here?
We learn how to use a View to display information provided by a Query.
In the previous part of the tutorial we saw how a Query component can be configured to define what information is extracted. We now need to define how this is displayed. To do this, we configure a View.
The Query itself provides you with four ways of quickly defining how query results are displayed on a page:
- Grid
- CSV
- Basic
- Query by Example
Other views are available as individual Components.
The simplest view is the Grid view, which is what we will use in the first part of this example. But you most often use separate Custom View components as they give the designer full control over how the page is displayed. We will see that usage next.
Simple Grid View
Open the Query, and select the 'Views-tab'.

In the 'Views' picker in the left-column select 'Grid'.
The preview area will show the entered data in a simple Grid view. Then in the 'Column' picker check the 'Title' box, and the preview will update to show the Title information.
We can now embed this Grid view onto a page.
Embed the Grid view
Select the 'Section 2-tab' on the example website, and an empty page will be displayed.
Use the Toolbox | Edit Page to open the Text Editor.
Use the  Insert Embed tool - the Edit Embed dialog will open with the Query option selected.
Click [Next>] to open the Query Content-tab.
Select the Query Q: Email from the drop down, then click [Finish]

The Page will now display the Query embed (right-click, Properties will return you to the config page).
Save the Page - and it will refresh to show the email addresses and names submitted earlier.
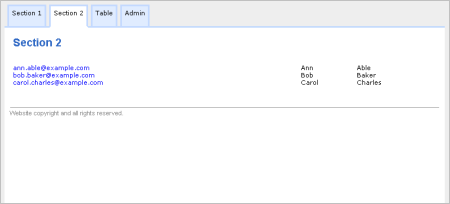
This is a live view of the database - as new entries are made, they will be shown automatically.
So, this is very basic example of embedding a view, so that you can see the principles in action.
In website and app development you will often use the much more flexible and powerful method: the Custom View:
Custom Views
A Custom View is a separate component that you embed on a page that allows you to configure exactly how data is displayed and linked.
Custom Views, together with Data Entry Forms, are key components for creating custom applications giving you total control over how data is displayed.
 Moving on - adding a Custom View
Below the line...
More information
The default View is the Grid.
Selecting Grid in the tree in the left panel will allow you to format the way the Query-results are displayed. You can select whether or not the Title is shown on the table at the Title checkbox. You can format the Style of table cells and table rows from the [...] controls - rows can be alternately styled (odd/even). The Table-view can be previewed in the dialog - clicking the [Update] button refreshes the preview.
The output is also available in a comma separated value - CSV format : For example:
"First Name","Last Name","Email Address",
"Ann","Able",ann@mydomain.com,
"Bob","Baker",bob@baker.com,
"Carol","Charles",carol@charles.com,
The CSV format allows you to easily export data collected within your nC app
The Basic view is used for prototyping apps and allows you to quickly create a view similar to a Custom View without using a separate component.
The Query by Example - the slice and dice - view provides a method to quickly provide a search form, where users can type in an example of what they are looking for, and then a list of matching results is shown.