
  |
| Previous page | Text Tutorial: Step-by-Step | Next page |
| Emailing form data | ||
 What are we learning here?
We learn how to send emails when a form is filled in.
This section of the Tutorial explains how to have an email sent each time a record is added to the Table - each time a visitor to your example site completes the form we just made.
Method
On your example website, select the Table and mouse-over the Toolbox. Select 'Configure Table' and the Table will reopen in the Configuration view. This time, select the Events-tab, and as shown below...
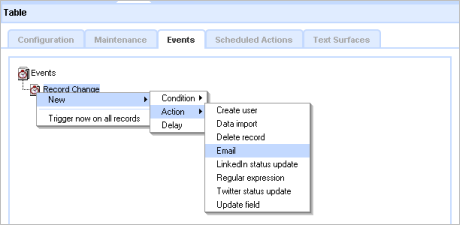
Right-click on Record Change, and select New, then Action, then Email from the menu - and click [OK]. The Events display will refresh and show the 'Email' in the Events-tree.

Right-click the 'Email' in the Events-tree and select [Properties] - the Email Editor will open.
Configure the emailer
The Email Editor allows you to construct the email that is sent by the website. You can directly enter information, and also embed data collected by the form.
For our simple example, we will create an email that sends the form data to an imaginary someone in Support at your domain.
Some entries are made manually and some use the data that you collected on the Form by using the Embed Option selector in the top-right corner - highlighted on the image above.
Outline
This 'Event Email' example will send an email to you giving you the Fist Name, Last Name and Email address of the visitor to your form on the website. In working with the emailer you will see that some entries are fixed, some use embedded data from the form, plus some boiler-plate text to make the finished email look correct. The email we make will be 'Plain Text' but it could be a fully formatted HTML email.
Method:
At the To: field write in the email address the email should be sent to - your own, for example, myname@domain.com
The Subject : will be Website Enquiry.
We want the email to appear as if it has come from the Visitor, using the information collected from the website form. So at the From: insert the cursor, then use the [choose an embed option] from the menu at the top of the Editor, and select 'Form Field - Email Address'.
Similarly, in the body of the email we mix directly entered texts with embedded form information to construct the email. The Form Field options refer to the information entered on the Form.
So, for example your emailer should look like this. Each of the highlighted entries is an Embed:

When you have completed the email, click [Apply], then [OK] back to the Event-tab. 
At the main Events-tab you must click the 'Apply' button in the right-column to confirm the configuration changes you have made.
You can now test your form by logging out, and visiting the form again, and cause an email to be sent to the test address.
Note that if you have not yet configured the email server in your installation, or if you are using a free Cloud trial then no email will be sent.
![]() Moving on - The Feed - Query - View model of data management
Moving on - The Feed - Query - View model of data management
Advanced configuration advice
The system includes an SMTP service to send out email messages direct 'server-to-server'.
You would normally configure the system to send email messages to your corporate mail-server or your Internet Service Provider's email service for onward delivery.
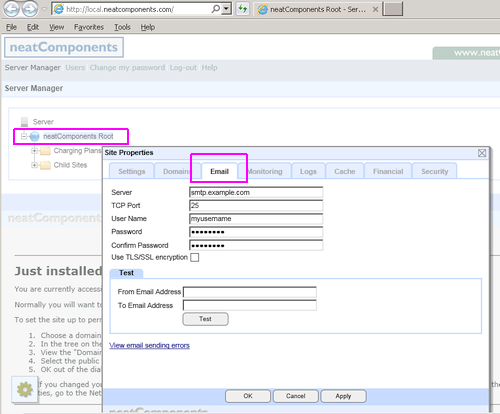
You configure this setting at the main
Site Manager | Globe node (right-click) - Email-tab
Mail Server: smtp.example.com
Mail Server Port: 25
You may also add SMTP Authentication (User Name & Password) and change the SMTP port if required by your ISP.
Do not enable 'Use TLS/SSL encryption' unless required by your ISP or mail server.
Default settings
If your version of Windows includes an SMTP server (on 127.0.0.1 - localhost) then nC uses that by default.
Troubleshooting email
There is advice on email configuration here...
| |||
| Text Tutorial: Step-by-Step | |||
|

