| Previous page | Text Tutorial: Step-by-Step | Next page |
| Simple page editing | ||
 What are we learning here?
We learn how to log in and use the editor to change the contents of a page.

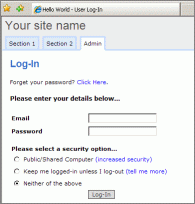
Select the 'Admin-tab'
and Log-in using the Username and Password that you created during the Install process.
Use the Toolbox to access the Text Editor
Select the 'Section 2' tab, and a blank page will come to view.

The toolbox is the key to working with the system.
All of the site creation and management starts with using the Toolbox.
Locate the Toolbox icon:![]()
Remember - you must be logged in to see the icon.
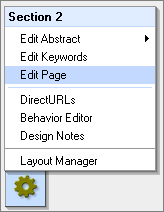
Mouse-over the Toolbox on that page, and the Toolbox menu will open.

You'll see a number of options available. At the moment we are interested in the following:
'Edit Page' which allows you to write and modify the contents of the page.
'Behavior Editor' allows you to manage advanced 'settings', permission control on who can see the page, and automatically creates the CSS style control.
'Layout Manager' gives you access to the site-tree and the site layout controls for navigation and the elements surrounding the page body.
Editing
Mouse over the Toolbox on your page, and select the 'Edit Page' option.
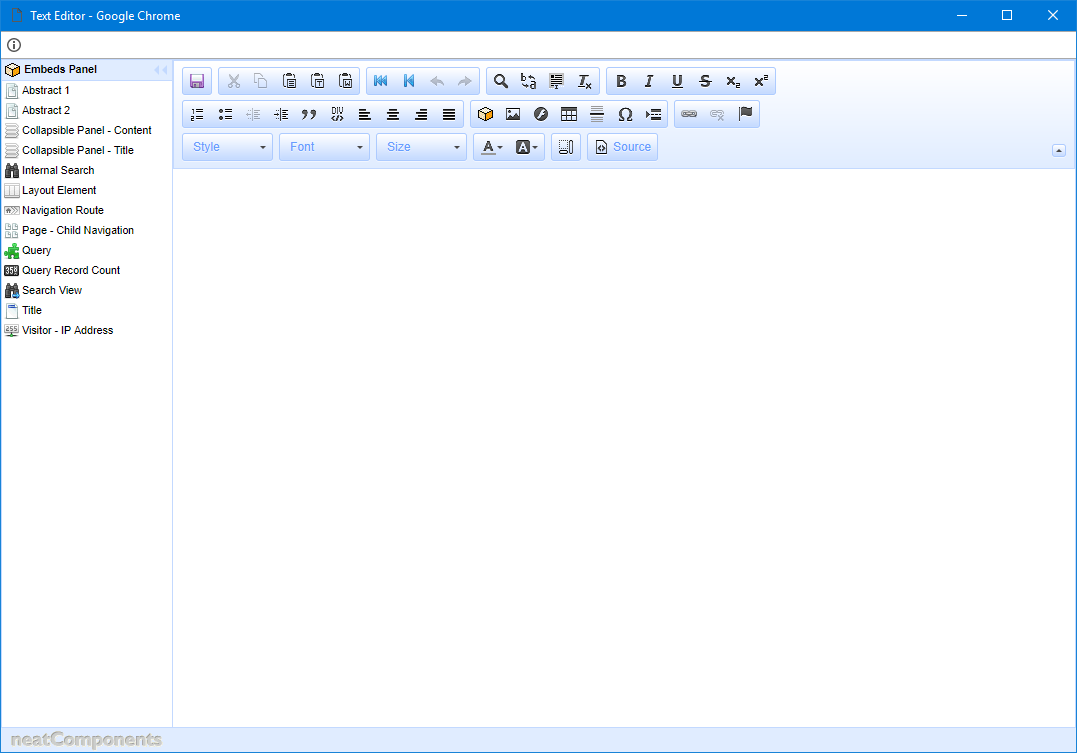
Your website will open a new window - the 'Text Editor'.

You can now enter text onto the blank page and format it in the normal way just like a word processor. You can also add images and links.
Text
If you 'copy & paste' from Microsoft Word, be sure to use the Word-tool in the toolbar. Word documents have hidden formatting that may affect the way your page displays, and the Word-tool makes sure that doesn't happen
Images
You can add images by selecting the Images-icon , and an image picker will open allowing you to select an image from your local machine and upload it direct to the page.
Drag from local machine
The upload dialog allows you to drag files, photos and documents, etc from the local machine directly into the system. Zipped files can be stored as zips for redistribution or expanded for immediate use.
You create links by selecting (highlighting) some text, or an image, and selecting the Link-icon. A link picker will open allowing you to configure the link with multiple options for local or remote pages, or to other assets such as documents or other deliverable files. For example, in addition to linking to an URL the Link picker will also allow you select a 'Document' on your local computer, upload it and link to it. The second tab of the link picker allows you to set whether the link opens in a new tab, set the Title, etc.
Embed data components
You can insert advanced data management tools by dragging them from the left column onto the page surface. At the moment, experiment with just adding text and formatting it - we'll come back to the more advanced data components later.
If you need more space you can close (and open) the left-side Embeds Panel using the chevron controls. You can also access the available embeds by using the special 'Embed Item' tool in the main menu. Data components are context sensitive so the components you see may change depending on the components being configured.
Source
You can access the HTML 'source' at any time by toggling the 'Source' link which allows you to directly edit the page, say for <DIV> positioning. If you want to add custom scripts you can access the appropriate fields via the Behavior Editor for the page.
Save
When you have finished editing the page, click the 'Publish Changes' icon - the page will be saved to the site and be live to view.
 Next - Let's work with the 'Layout Manager' ...
Below the line...
Advanced configuration advice
neatComponents provides comprehensive Style, Settings and Permissions controls, available from the 'Behavior Editor' option in the Toolbox - while we won't need these tools for this simple example, you can see what is available if you wish.
Layout Manager
Sites are constructed by adding 'components' to the 'layout' by drag-and-drop using the 'Layout Manager' for the site. This has already been done for your Trial. The Layout Manager also gives access to the controls for Navigation and the settings for the site's appearance and repeating elements.
Behavior Editor
The Style (CSS Editor), Settings and access Permissions for each component are set from the Behavior Editor. (More...)
DirectURL Editor
neatComponents websites have built-in automatic navigation, with numeric page numbering. The Direct URL Editor enables you to set a readable name for each 'page'
Edit Abstract
Every component has two extra editable text-areas associated with it that can be embedded on a page. The Abstracts exists separately from the normally visible content. These are used a lot in creating Mobile-friendly and Desktop-friendly sites that use the same data but with different layouts
Edit Keywords
Every component can have key words associated with it - useful for creating specific criteria for simple search results modification.
Edit Section
The Edit Section or Edit Page tool gives direct access to the webpage for editing. Access to a webpage is controlled by the permissions set in its Behavior Editor. Editing a page may be as simple as changing a direct-entry - traditional Content Management - or it may involve embedding a component on the page for more sophisticated data management.
Other tools are displayed in the Toolbox depending on the context in which you are working and other options selected, for example, if the page has 'Content Approval' enabled.
| |||
| Text Tutorial: Step-by-Step | |||
|


