Site UpgradingUpgrading a site
With careful design, it can be possible to make changes to a live site without adversely impacting users. However, there are times when it is sensible to take a copy of a site, makes changes to that, and then apply the changes in a single ‘upgrade’ operation to the live site.
The obvious challenge here is that you do not want to simply swap out the live site with the new one, since the live site will have recent transactions and data changes of its own that will want to be preserved and merged in with the update site. The upgrade process handles this, as described below:
Typical scenarios when this is useful include:
- Making substantial changes that would interfere with live users if made directly to the Live site
- Testing changes if you are uncertain about what will work
- Making changes to a set of sites based on the same template
- Making changes to a site that you don't have access to yourself
Understanding what gets upgraded
The important aspect of site upgrading is understanding how the system chooses which aspects to use from the live site, and which aspects to take from the updated site.
In describing this we use the following terms:
- Live site – the original site
- Update site – a copy of a snapshot of the Live Site, that has had changes made to it
- New site – the site that has been updated with the changes from the Update site, and which then becomes the ‘live’ site
The expectation is that the Live site is busy being used, and this is resulting in continuous changes to a range of data that must not be lost. These include:
- Table data
- User data
- Transaction data
- Domain names and site properties
- Site usage log files
Everything else that is changed in the Update site takes precedence over the Live site when an Update is made. This includes:
- Page contents
- Table structure
- Queries
- Pages
- Styling
Method:
- Take a copy of the Live site. We will call this copy the ‘Update site’
- In the Site Manager, select the Live site, and choose Copy or Export
- (Keep the Live site running.)
- Make changes to the Update site.
- Apply the Update site to update the Live site.
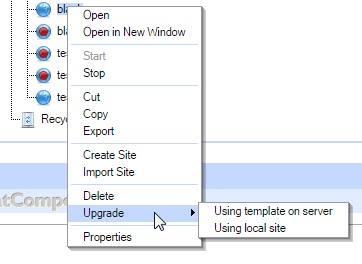
- In the Site Manager, select the Live site, and choose Upgrade
- Choose a Template that is already on the server, or to upload an Update site from your local machine.

The Upgrade process
When the Upgrade process is triggered, the system takes the Live site offline and makes a safety backup of it. It then compares the Live site to the Update site, and makes any modification necessary to the structure of the Tables (adding or removing fields, or changing field datatypes). A copy of the Update site is taken, which will become the new Live site at the end. The Tables, Users, Transaction data, log data and site properties are copied over to this, and the new site is set Live.
After the Upgrade, you are left with the new site, set live, and a backup of the old live site, set offline.
Notes
If the Live site is set to send scheduled emails, be sure to place the Update site in ‘demo mode’, which will prevent these from being sent out while you are working on the updates. (They will then go to the Site Owner, rather than the expected recipients)
Normally the content on Page surfaces is updated with the content from the Update site, so if you need the content from the Live site to be retained instead, be sure to store this content in a Table, and use a Query to place it on the Page.
If you are unsure whether an Upgrade will work as you expect, take a copy of the Live site, and Upgrade the copy first.
If you have several sites based on the same template, you can update them all using a single Update site.
|